便携AI聚合API目前已经接入了OpenAI最新的AI图像生成和编辑模型gpt-image-1,支持图片生成(generations)和图片编辑(edits),可以自定义图片质量(quality),本文分享下gpt-image-1模型的接入与使用方法。
一、模型介绍
gpt-image-1是OpenAI目前最先进的图像处理模型,继承了GPT-4o的多模态能力,并在图像生成方面进行了显著优化,支持API调用。
gpt-image-1有两个功能:
- 生成:根据文本提示从零开始生成图像
- 编辑:使用新的提示修改现有图像,可以是部分修改或完全修改
gpt-image-1支持3种尺寸(size),每种尺寸又有3种图片质量(quality),对应的消耗如下:
| Quality | Square (1024×1024) | Portrait (1024×1536) | Landscape (1536×1024) |
|---|---|---|---|
| Low | 272 tokens | 408 tokens | 400 tokens |
| Medium | 1056 tokens | 1584 tokens | 1568 tokens |
| High | 4160 tokens | 6240 tokens | 6208 tokens |
gpt-image-2更多参数可以参考OpenAI官网介绍:https://developers.openai.com/api/docs/guides/image-generation
二、模型使用方法
便携AI聚合API支持通过OpenAI官方python包或者requests(curl)调用gpt-image-1,两种方式都可以自定义参数。示例中的api_key可以在网站后台获取,获取方法:《便携AI聚合API新建令牌(API key)教程》。
注意:
- 如果使用OpenAI官方python包,请将package更新到最新版本,旧版部分功能不支持;
- 本文的requests调用方法以python为例,其他语言直接让ChatGPT帮忙改写一下即可。
1、图像生成
1)python包调用方法
    import base64
    from openai import OpenAI
    client = OpenAI(
        api_key=api_key, # 将这里换成你在便携AI聚合API后台生成的令牌
        base_url="https://api.bianxie.ai/v1")

    img = client.images.generate(
        model="gpt-image-1",
        prompt="A cute baby sea otter",
        n=1,
        size="1024x1024",
        quality="low"
    )

    image_bytes = base64.b64decode(img.data[0].b64_json)
    with open("output.png", "wb") as f:
        f.write(image_bytes)
2)requests调用方法
api_key = 'sk-Xy3WuCpTTvY'

url = 'https://api.bianxie.ai/v1/images/generations'

data = {
    "model": "gpt-image-1",
    "prompt": "A cute baby sea otter",
    "n": 1,
    "size": "1024x1024"
}

headers = {
    "Authorization": f"Bearer {api_key}",
    "Content-Type": "application/json"
}

response = requests.post(url, headers=headers, json=data)
base64_to_image(response.json()['data'][0]['b64_json'], "output_curl.png")
print(response.json())
这是用到的base64转image函数:
def base64_to_image(b64_string, image_path):
    image_data = base64.b64decode(b64_string)
    with open(image_path, "wb") as f:
        f.write(image_data)
3)调用结果

2、图像编辑
1)python包调用方法
import base64
from openai import OpenAI
client = OpenAI(
api_key='sk-Xy3WuCpTTvY', # 将这里换成你在便携AI聚合API后台生成的令牌
base_url="https://api.bianxie.ai/v1")
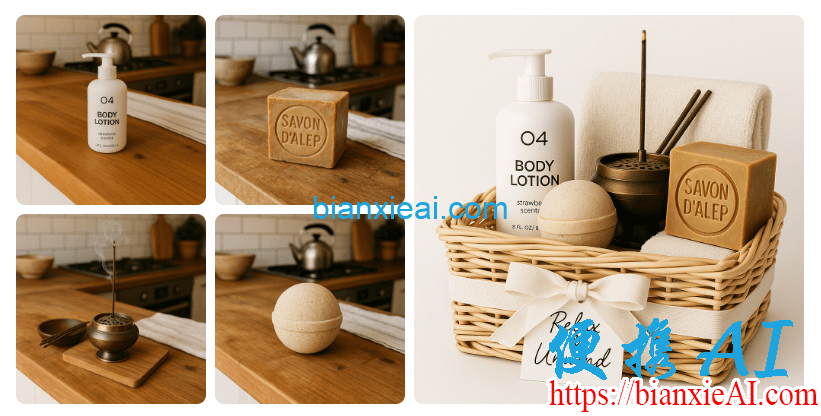
prompt = """
Generate a photorealistic image of a gift basket on a white background
labeled 'Relax & Unwind' with a ribbon and handwriting-like font,
containing all the items in the reference pictures.
"""
result = client.images.edit(
model="gpt-image-1",
image=[
open("body-lotion.png", "rb"),
open("bath-bomb.png", "rb"),
open("incense-kit.png", "rb"),
open("soap.png", "rb"),
],
prompt=prompt
)
image_base64 = result.data[0].b64_json
image_bytes = base64.b64decode(image_base64)
# Save the image to a file
with open("gift-basket.png", "wb") as f:
f.write(image_bytes)
2)requests调用方法
import requests

url = "https://api.bianxie.ai/v1/images/edits"
api_key = 'sk-Xy3WuCpTTvY'

# Prepare the files (image paths)
files = [
    ("image[]", open("body-lotion.png", "rb")),
    ("image[]", open("bath-bomb.png", "rb")),
    ("image[]", open("incense-kit.png", "rb")),
    ("image[]", open("soap.png", "rb"))
]

# Prepare the form data
data = {
    "model": "gpt-image-1",
    "prompt": "Create a lovely gift basket with these four items in it",
    "quality": "low"
}

# Set the headers
headers = {
    # "Content-Type": "multipart/form-data",
    "Authorization": f"Bearer {api_key}"
}

# Send the request
response = requests.post(url, headers=headers, files=files, data=data)

# Check if the response is successful
if response.status_code == 200:
    # Extract the base64 encoded image and decode it
    result = response.json()
    image_base64 = result['data'][0]['b64_json']
    image_bytes = base64.b64decode(image_base64)

    # Save the image to a file
    with open("gift-basket.png", "wb") as f:
        f.write(image_bytes)
else:
    print(f"Error: {response.status_code} - {response.text}")

# Close all file handles after use
for file in files:
    file[1].close()
3)调用结果
3、图像局部修改
1)python包调用方法
from openai import OpenAI
 client = OpenAI(
     api_key = 'sk-Xy3WuCpTTvY',
     base_url="https://api.bianxie.ai/v1")

 result = client.images.edit(
     model="gpt-image-1",
     image=open("sunlit_lounge.png", "rb"),
     mask=open("mask.png", "rb"),
     prompt="A sunlit indoor lounge area with a pool containing a flamingo",
     quality="low"
 )

 image_base64 = result.data[0].b64_json
 image_bytes = base64.b64decode(image_base64)

 # Save the image to a file
 with open("composition.png", "wb") as f:
     f.write(image_bytes)
2)requests调用方法
import requests
import base64

url = "https://api.bianxie.ai/v1/images/edits"
api_key = 'sk-Xy3WuCpTTvY'

# Open the image and mask files to upload
files = {
    "image[]": open("sunlit_lounge.png", "rb"),
    "mask": open("mask.png", "rb")
}

# Prepare the form data
data = {
    "model": "gpt-image-1",
    "prompt": "A sunlit indoor lounge area with a pool containing a flamingo",
    "quality": "low"
}

# Set the headers for authorization
headers = {
    "Authorization": f"Bearer {api_key}"
}

# Send the request using multipart/form-data
response = requests.post(url, headers=headers, files=files, data=data)

# Check if the response is successful
if response.status_code == 200:
    # Extract the base64 encoded image and decode it
    result = response.json()
    image_base64 = result['data'][0]['b64_json']
    image_bytes = base64.b64decode(image_base64)

    # Save the image to a file
    with open("lounge.png", "wb") as f:
        f.write(image_bytes)
else:
    print(f"Error: {response.status_code} - {response.text}")

# Close all file handles after use
for file in files.values():
    file.close()
3)调用结果
